Integrating reCAPTCHA by Google with Citrix ADC is a great move towards protecting internal resources from attackers. If someone or even a bot of computers are trying to brute force an account, or break in to your system, having reCAPTCHA is sure to defer such activies and make it a very difficult task to achieve.
Note: This article describes the methods to configure reCaptcha on Citrix ADC running firmware version 12.1 build 50.28 or higher. For methods on older builds, see here.
In this post, I’ll describe how you can place reCAPTCHA in the first line of authentication with WebAuth, and LDAP as the second factor. This is all using nFactor for ADC Unified Gateway which was released in versions 11.1. I’ve previously described how you can use RADIUS, LDAP and Azure authentication technologies with nFactor to create a dynamic real-time authentication system. You can read more about that here https://jgspiers.com/nfactor-authentication-with-netscaler-gateway/
To begin integrating reCAPTCHA with ADC, you first need to sign up to the free service https://www.google.com/recaptcha/admin
Select reCATPCHA V2. Specify a descriptive label and enter your domain name which will be the FQDN of Citrix Gateway.
Note: Invisible reCAPTCHA has not been released for GA so do not choose this.
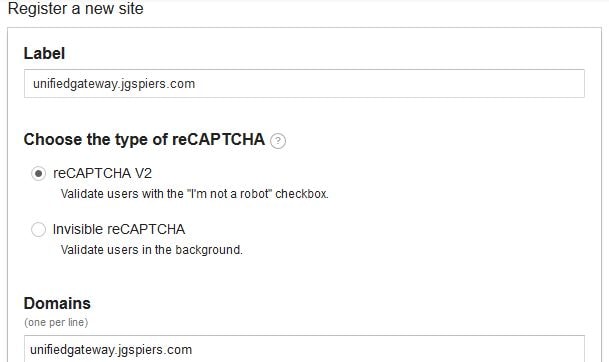
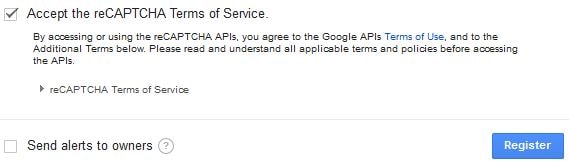
Agree to the ToS and click Register.

You’ll be given a Site key and Secret key. Keep these secure and safe, you’ll need them later.
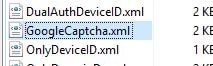
Log on to ADC using a program such as WinSCP and create a new Login Schema file. This file will generate the UI users see when logging on to ADC, containing the reCAPTCHA box and a username field. The username is extracted and placed in the next Login Schema for LDAP authentication. Login Schemas that you create should reside in /nsconfig/loginschema/.
The XML code you need is here, take a copy:
<?xml version="1.0" encoding="UTF-8"?>
<AuthenticateResponse xmlns="http://citrix.com/authentication/response/1">
<Status>success</Status>
<Result>more-info</Result>
<StateContext></StateContext>
<AuthenticationRequirements>
<PostBack>/nf/auth/doAuthentication.do</PostBack>
<CancelPostBack>/nf/auth/doLogoff.do</CancelPostBack>
<CancelButtonText>Cancel</CancelButtonText>
<Requirements>
<Requirement><Credential><ID>login</ID><SaveID>ExplicitForms-Username</SaveID><Type>username</Type></Credential><Label><Text>User name:</Text><Type>plain</Type></Label><Input><AssistiveText>Please supply either domain\username or user@fully.qualified.domain</AssistiveText><Text><Secret>false</Secret><ReadOnly>false</ReadOnly><InitialValue></InitialValue><Constraint>.+</Constraint></Text></Input></Requirement>
<Requirement><Credential><ID>saveCredentials</ID><Type>savecredentials</Type></Credential><Label><Text>Remember my password</Text><Type>plain</Type></Label><Input><CheckBox><InitialValue>false</InitialValue></CheckBox></Input></Requirement>
<Requirement><Credential><ID>nf-recaptcha</ID><SaveID>ExplicitForms-Username</SaveID><Type>nf-recaptcha</Type></Credential><Label><Text>Captcha:</Text><Type>plain</Type></Label></Requirement>
<Requirement><Credential><Type>none</Type></Credential><Label><Text>Please enter your username and verify captcha</Text><Type>information</Type></Label><Input /></Requirement>
<Requirement><Credential><ID>loginBtn</ID><Type>none</Type></Credential><Label><Type>none</Type></Label><Input><Button>Log On</Button></Input></Requirement>
</Requirements>
</AuthenticationRequirements>
</AuthenticateResponse>
Now add a Login Schema Profile to ADC. Log on to the GUI, navigate to Security -> AAA – Application Traffic -> Login Schema -> Profiles -> Add.
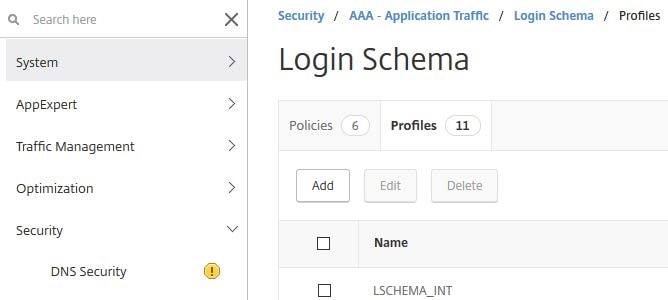

Specify an appropriate name and click on the edit button under noschema.
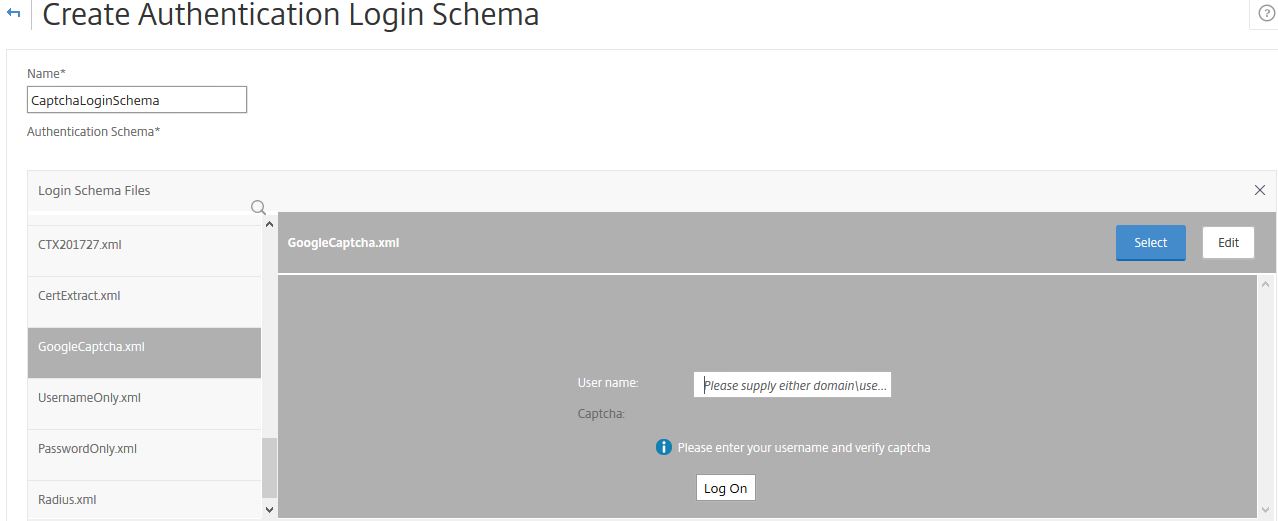
Select the Google Captcha Login Schema. Click Select.
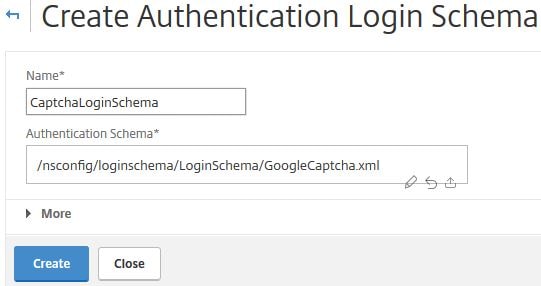
Click Create.
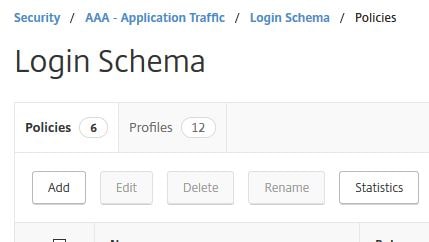
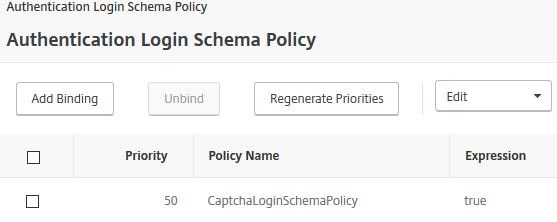
Next create a Login Schema Policy. Click the Policies tab -> Add.
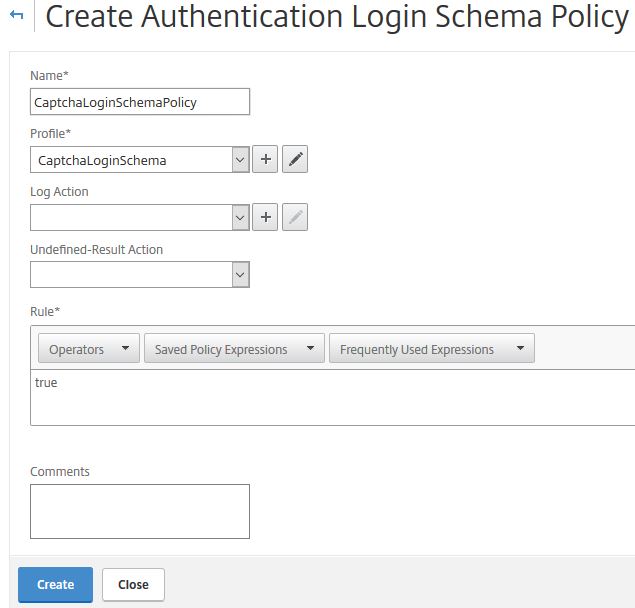
Specify an appropriate name, under Profile choose the Login Schema Profile you created. Under Rule enter true. Click Create.
Edit your AAA vServer and bind the Login Schema directly to this server. I’m assuming you have already created the AAA vServer, Authentication Profile and other parts to use nFactor. If you have not, use the link at the top of this post for guidance. This Login Schema will now apply to all users logging on to my ADC. This is the first schema/UI that will be shown to users.

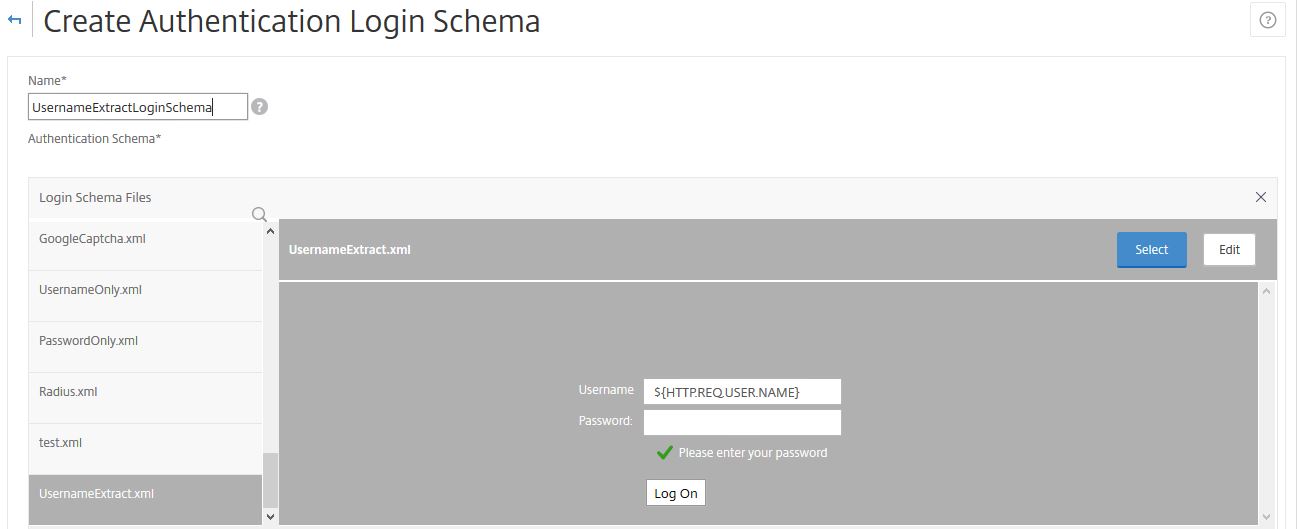
We need another Login Schema, this is for the second factor using LDAP. The Login Schema contains a username and password box, however the username is extracted from the previous WebAuth/reCAPTCHA schema. Create a new Login Schema file as below.
The XML code you need is here, take a copy:
<?xml version="1.0" encoding="UTF-8"?><AuthenticateResponse xmlns="http://citrix.com/authentication/response/1"><Status>success</Status><Result>more-info</Result><StateContext /><AuthenticationRequirements>
<PostBack>/nf/auth/doAuthentication.do</PostBack><CancelPostBack>/Citrix/Authentication/ExplicitForms/CancelAuthenticate</CancelPostBack><CancelButtonText>Cancel</CancelButtonText>
<Requirements><Requirement><Credential><ID>login</ID><SaveID>ExplicitForms-Username</SaveID><Type>username</Type></Credential><Label><Text>Username</Text><Type>plain</Type></Label><Input><AssistiveText>Please supply either domain\username or user@fully.qualified.domain</AssistiveText><Text><Secret>false</Secret><ReadOnly>true</ReadOnly><InitialValue>${AAA.USER.NAME}</InitialValue><Constraint>.+</Constraint></Text></Input></Requirement><Requirement><Credential><ID>passwd</ID><SaveID>ExplicitForms-Password</SaveID><Type>password</Type></Credential><Label><Text>Password:</Text><Type>plain</Type></Label><Input><Text><Secret>true</Secret><ReadOnly>false</ReadOnly><InitialValue/><Constraint>.+</Constraint></Text></Input></Requirement>
<Requirement><Credential><Type>none</Type></Credential><Label><Text>Please enter your password</Text><Type>confirmation</Type></Label><Input /></Requirement>
<Requirement><Credential><ID>saveCredentials</ID><Type>savecredentials</Type></Credential><Label><Text>Remember my password</Text><Type>plain</Type></Label><Input><CheckBox>
<InitialValue>false</InitialValue></CheckBox></Input></Requirement><Requirement><Credential><ID>loginBtn</ID><Type>none</Type></Credential><Label><Type>none</Type></Label><Input><Button>Log On</Button></Input></Requirement></Requirements></AuthenticationRequirements>
</AuthenticateResponse>
Create another Login Schema Profile for the username extraction piece as shown below, using the XML file you created. You don’t need to create a Login Schema Policy.

Next create a Policy Label for the second LDAP factor. Navigate to Security -> AAA – Application Traffic -> Policies -> Authentication -> Advanced Policies -> Authentication Policy Labels -> Add.
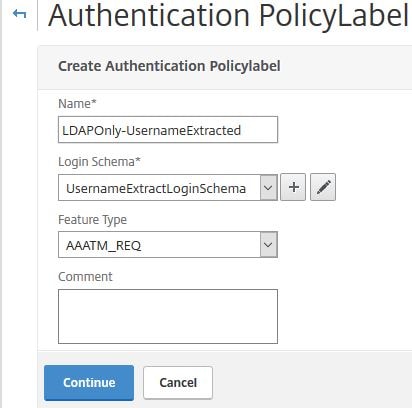
Enter a name, under Login Schema choose the Username Extract Login Schema you just created. Click Continue.
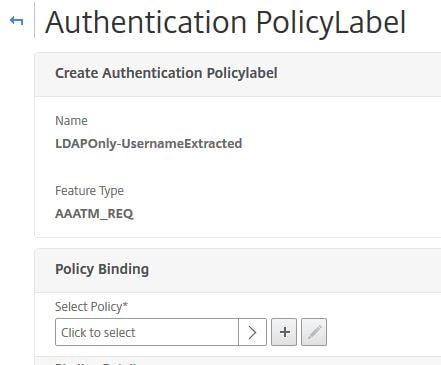
Click on Click to select under Select Policy.
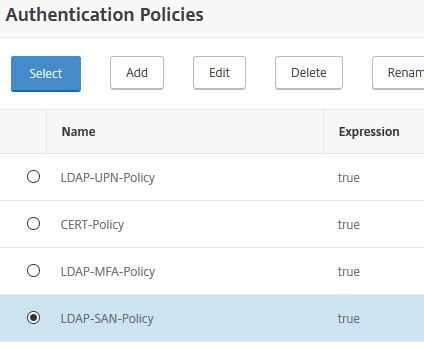
Bind your LDAP policy, if you don’t have one, create one first. Click Select.
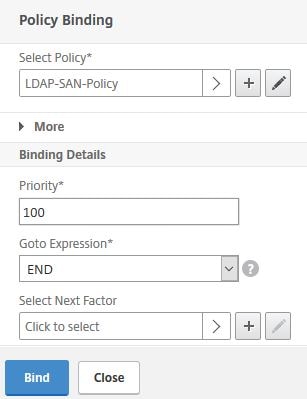
Under Goto Expression select END. No other factors will be used. Click Bind.
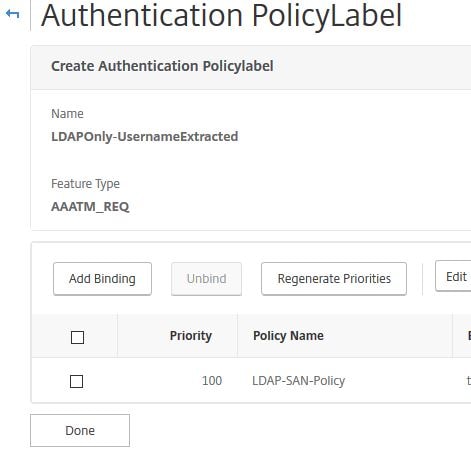
Click Done.
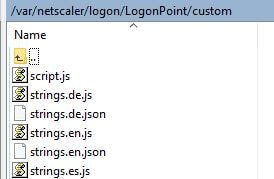
Next navigate to using WinSCP or similar, navigate to var/netscaler/logon/LogonPoint/custom on ADC. Edit the script.js file and enter the following JavaScript code:
Note: Replace the key beside var reCaptchaSiteKey = with your own Site key.
/*
* Custom credential handler for Google ReCaptcha.
* If a credential of type "nf-recaptcha" is sent in any factor, this code
* will be executed. The "submit" button of the form will be disabled
* by default until the CAPTCHA is completed correctly.
*
* Use with the below WebAuth action:
* add authentication webAuthAction recaptcha -serverIP <IP Address of google.com> -serverPort 443 -fullReqExpr q{"POST /recaptcha/api/siteverify HTTP/1.1\r\n" + "Host: www.google.com\r\n" + "Content-Type: applica
tion/x-www-form-urlencoded\r\n" + "Content-Length: 10000"+"\r\n\r\n" + "secret=<Secret key from Google Recaptcha>&response=" + http.req.body(10000).after_str("&recaptcha=")} -scheme https -successRule "http.RES.body(1000).REGEX_MATCH(re/
\"success\": true.*\"hostname\": \"<FQDN of the Gateway/Auth vServer>\"/)"
*
*/
CTXS.ExtensionAPI.addCustomCredentialHandler({
getCredentialTypeName: function () { return "nf-recaptcha"; },
getCredentialTypeMarkup: function (requirements) {
var reCaptchaSiteKey = "6LfAtxoUAAAAAKaGJY2RO7QGLBM8BRcQDf5dACaG"; //Replace this with the SiteKey from Google ReCaptcha
var div = $("<div></div>");
var CAPTCHA = $('<div id="g-recaptcha" class="g-recaptcha" data-callback="captchaSuccess"></div>').attr("data-sitekey", reCaptchaSiteKey);
var input = $('<input id="captchaResponse" name="recaptcha" type="hidden" value=""/>');
div.append(CAPTCHA, input);
var script = document.createElement("script");
script.type = "text/javascript";
script.src = "https://www.google.com/recaptcha/api.js";
script.onerror = function(){
var $form = $(".credentialform")[0];
var fieldDiv = $('<div class="field CredentialTypenone"></div>');
var leftDiv = $('<div class="left"></div>');
var label = $('<div class="standaloneText label error" role="alert"></div>').text("Could not load Google ReCaptcha. Please contact your administrator.");
leftDiv.append(label);
fieldDiv.append(leftDiv);
$($form).append(fieldDiv);
};
$("head")[0].appendChild(script);
$(document).on('ctxsformsauthenticationdisplayform', function (e, data) {
var $form = data.authenticationElement.find('.credentialform');
var $CAPTCHA = $form.find('#g-recaptcha');
$loginButton = $form.find('#loginBtn');
if ($CAPTCHA.length && $loginButton.length) {
// This is a CAPTCHA form
// Disable the submit button by default
disableFormsButton($loginButton);
}
});
return div;
}
});
/* End ReCaptcha code */
var $loginButton;
function captchaSuccess(data) {
$("#captchaResponse").val(data);
enableFormsButton($loginButton);
}
function disableFormsButton($button) {
// Disable the button and stop it appearing clickable
$button.addClass('disabled').removeAttr('href');
}
function enableFormsButton($button) {
// Enable the button and make it clickable again
$button.removeClass('disabled').attr('href', '#');
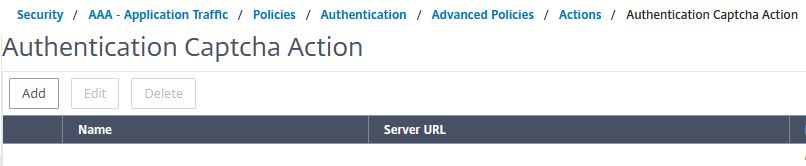
}Navigate to Security -> AAA – Application Traffic -> Policies -> Authentication -> Advanced Policies -> Actions -> CAPTCHA -> Add. The CAPTCHA policy is used for reCAPTCHA verification with Google.
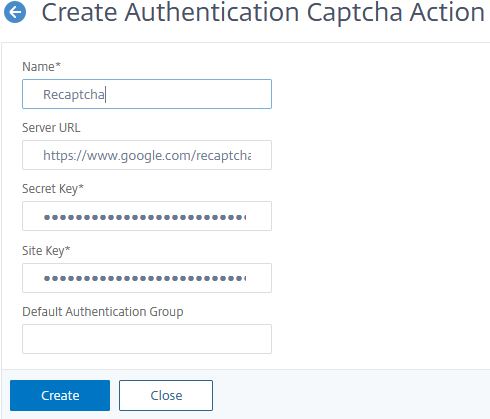
Enter an appropriate name, the Server URL can be left blank, and will auto-populate with https://www.google.com/recaptcha/api/siteverify. The Secret Key and Site Key will be what Google provided to you. Click Create.
Now, from CLI, run command add authentication policy GoogleRecaptcha -rule true -action GoogleRecaptcha.

Navigate back to the AAA vServer and add a new Authentication Policy.
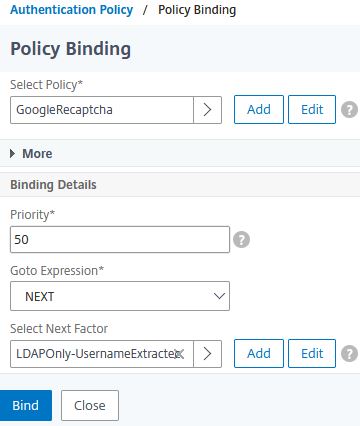
Select the CAPTCHA policy as first factor, choose the LDAP Only/Username Extracted Policy Label for Next Factor. Click Bind.
Your Authentication Policy should look like this. It’s time to test it out.

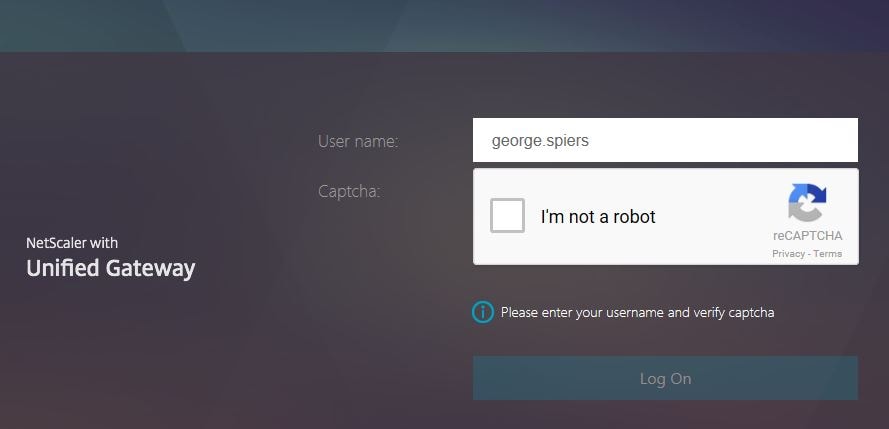
When navigating to Citrix Gateway, the first Login Schema CaptchaLoginSchema displays with a username and captcha field. Enter your username and then tick I’m not a robot.
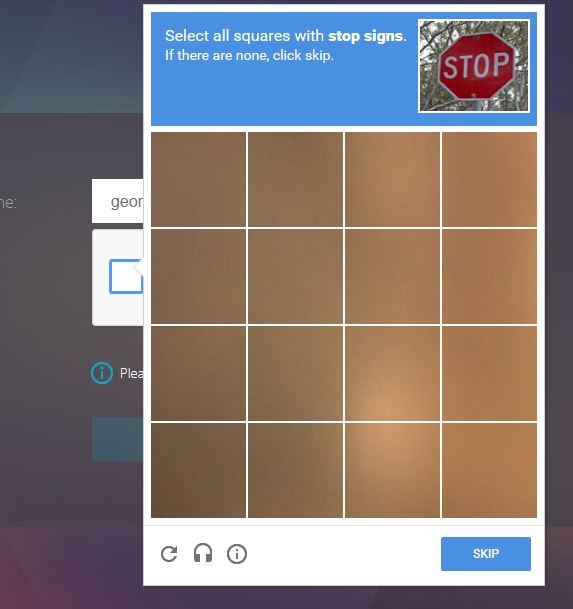
You will be challenged to select a number of specific pictures, in my case, there was nothing to select so I clicked SKIP.
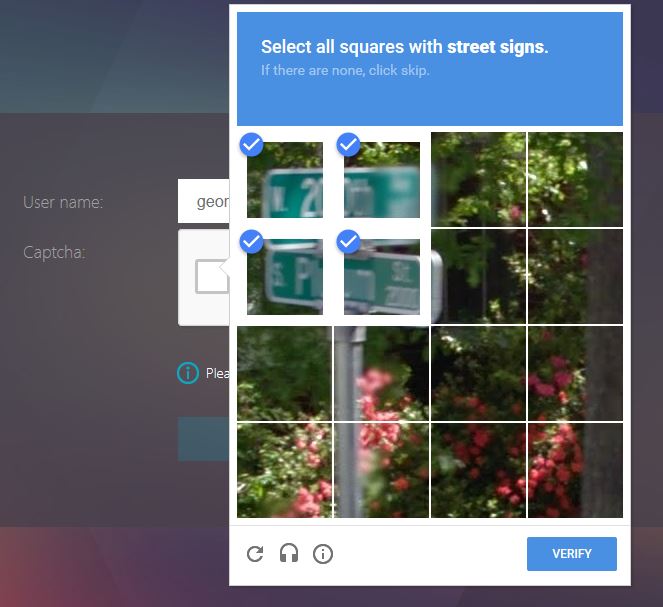
Next I was challenged to select all squares with a street sign. Click VERIFY.
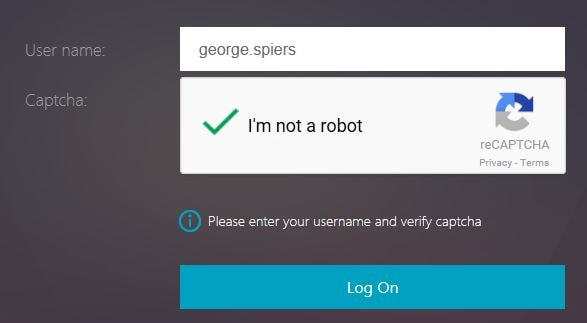
Captcha verification is complete and you’ll be able to continue to the next factor. Click Log On. At this stage, the username you entered will be captured and fed through to next factor. You could in theory do something such as Group Extraction or other methods and apply many different factors based on who the user is.
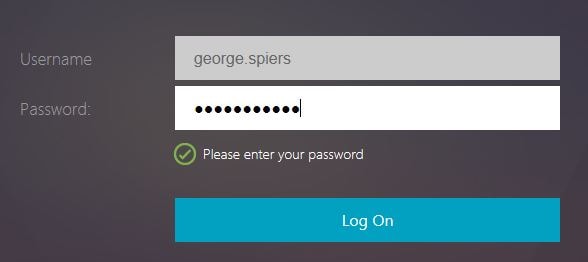
In my case, I’m only selecting LDAP. Notice the second Username Extract Login Schema now shows, with my username extracted from previous factor. Enter password and click Log On.
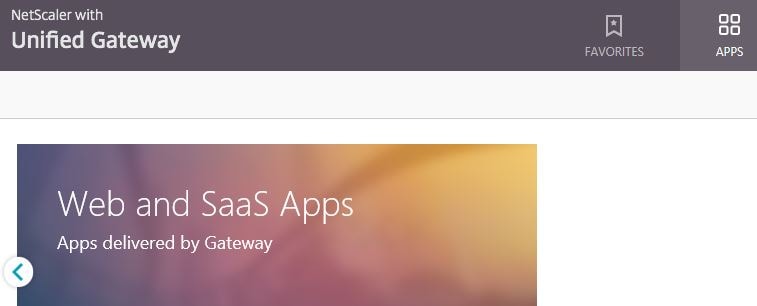
Log on to Unified Gateway is successful.
Goudduif
November 5, 2019Thanks for sharing this article.
So far I can see is the nfactor a great option on the ADC, I’ve only still some questions.
For example when We will enable the EPA scan option. What’s happens when a user can’t install the EPA client?
Is there then an option available, that when there’s no response from the EPA client in X seconds, the user logon with limited access?
While so far I can see, when there’s no EPA installed, it show you a option to install them, otherwise you can’t logon.
George Spiers
December 1, 2019Yes you should be able to set it that clients who do not have EPA fail and receive limited access (via a limited Session Profile).
George29
January 28, 2024would captcha protect this scenario:
https://discussions.citrix.com/topic/419950-netscaler-citrix-gateway-aaa-vserver-password-spray/
looks like a simple post to the AAA vserver can allow a lockout, does nfactor flow still make a difference?
Ben Parker
December 18, 2024Does this still apply to v13.1? Trying to implement it now
PRunyan
January 11, 2026Yes, Ben Parker, I was able to use these instructions to modify a Netscaler running v13.1. Admittedly, I also had to use some different instructions from another site to get the AAA vServer setup, as the link George says is at the top of this article for setting that up seems to be missing. But all of the code here still seems to work.